The primary goal of a protein scientist is to study the structure and function of proteins. However, proteins are innately everywhere and surrounded by a lot of other cellular components. They are very small, which is why their structure must be studied indirectly, and they are found in many different cell types. How do scientists find the protein that they are looking for and then get it by itself?
It may sound like something out of a science fiction novel, but scientists have found a way to “code” a cell, telling it exactly what protein they want it to express. More specifically, bacteria cells are coded with a gene for a protein because their genetic code is found and read in circular pieces of DNA known as plasmids. A plasmid is just a double strand of DNA that forms a closed loop and contains all of the genetic material for the bacteria cell. It is “read” and transcribed into proteins using a start and stop site to tell a protein called RNA polymerase II where to attach and transcribe genetic information. Scientists can insert the gene for a protein between this start and stop site and use the bacteria’s machinery to manufacture the protein of interest, like a little factory! This takes advantage of what DNA does naturally: express genes and turn them into proteins (see Central Dogma here). It is known as recombinant protein production.
Technique: Cloning and PCR
In order to utilize a bacterium’s cellular machinery to make a particular protein, scientists have developed methods of inserting a gene for a protein into a circular plasmid. This technique is known as cloning, because you essentially copy a gene from one source and “clone” it into another, the plasmid. Cloning a gene into a plasmid takes advantage of a procedure known as a polymerase chain reaction, or PCR. A PCR reaction has 3 main steps:
- Denaturing – strands of DNA are separated by heating the molecule to 95oC
- Hybridizing/Annealing – solution cooled to 54oC and allow primers to anneal to 5’ end flanking sequence (sense) and 3’ end flanking sequence (antisense)
- Primers: short sequences of DNA (18-22bp) that bind to a site upstream and downstream of the gene of interest to allow it to be read
- Elongation – DNA synthesis of gene between primers/flanking sequences; solution heated to 72oC which is the optimal temperature for DNA synthesis by Taq polymerase (Thermus aquaticus)
- Taq polymerase: Heat-stable DNA polymerase from a thermophilic archaea from hot springs
- dNTPs: deoxynucleoside triphosphate in A, T, C, and G to build new strands of DNA
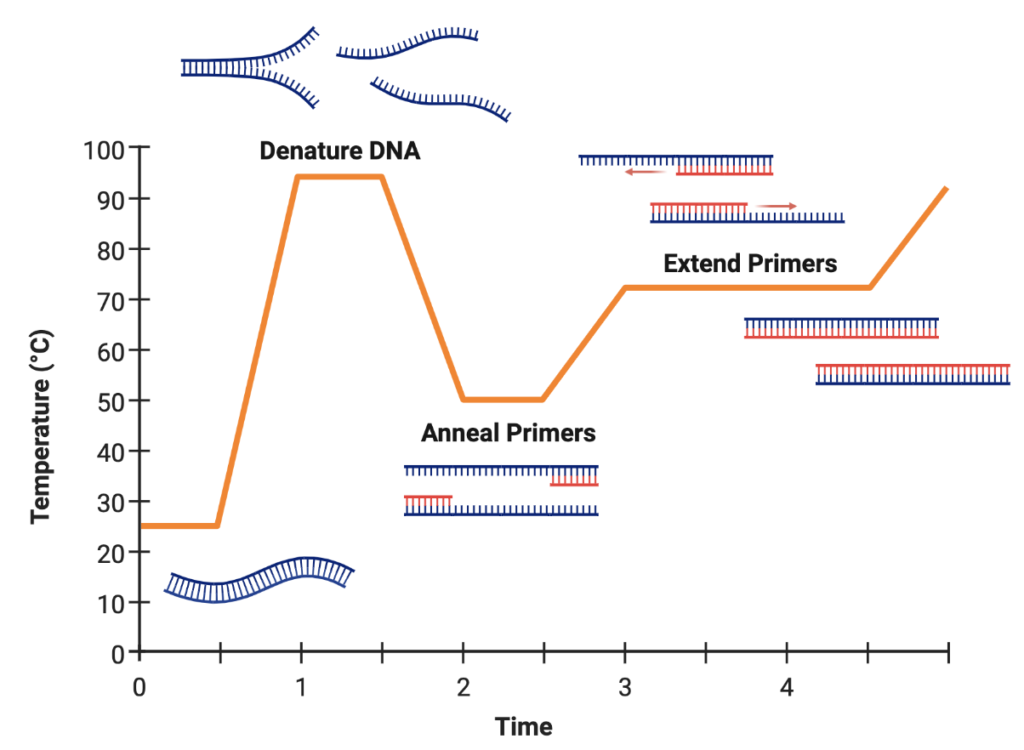
This process is then repeated for about 20-30 cycles, cycle amplifying the gene of interest 2n-fold. In order to clone, both the plasmid and the gene of interest must be amplified by PCR with overlapping ends that are capable of matching each other in sequence. These pieces are then combined in a process known as DNA ligation to make millions of copies of plasmids with a gene for a protein inside.
Technique: Bacteria Growth and Protein Expression
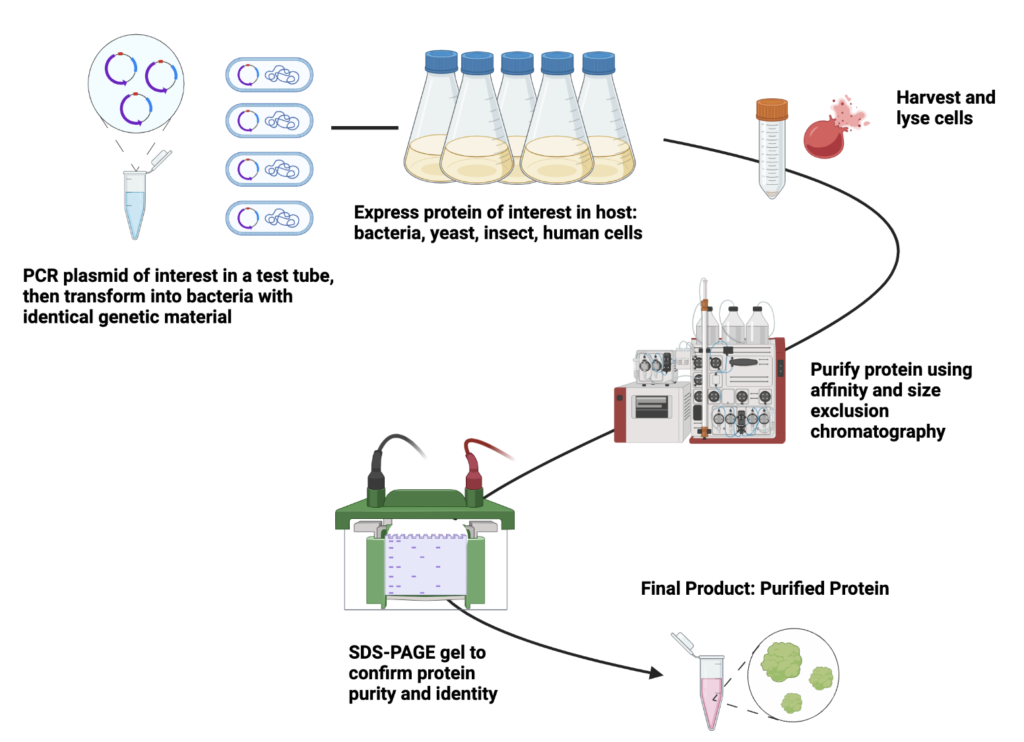
Once a plasmid with a desired protein sequence has been cloned, it must be transferred into a bacteria cell. The bacteria cell will then recognize the plasmid as genetic material and copy it and produce the protein it encodes. The following describes the process of getting the plasmid into a bacteria cell and then using said bacteria to produce a lot of protein:
- Transformation: The plasmid is introduced to bacteria cells by adding a small amount to the surrounding environment of the cells. Bacteria have an innate ability to react to stressors in their environment, often by accepting materials from their surroundings to try to prevent infection or dying. Exposing the bacteria to heat will cause them to take up things from their environment, i.e. the plasmid of interest, and then allowing them to recover in media will cause more to reproduce with the same plasmid.
- Culturing: The bacteria cells from the transformation are often plated on an agar/broth mixture that separates them into colonies. Each colony contains bacteria cells with the same genetic information, meaning they should all have the cloned plasmid with the inserted gene for the protein. Taking one of these colonies off the plate and growing it in liquid media will allow it to replicate into many more bacteria cells that all have the same genetic code
- Expression: Once many bacteria cells have been grown with the same genetic material, it’s time to induce expression. This means that while they have been growing and replicating, they haven’t necessarily been producing the protein because this would cost them a lot of energy. However, giving them a source of energy like sugar will allow the bacteria to translate their plasmid DNA into RNA, then transcribe the RNA into protein (see Central Dogma here). There is a much more involved explanation to this process, but suffice it to say that IPTG is added at this stage to liters of bacteria to produce lactose which allows them to express protein.
- Harvest: The bacteria growing in liquid culture has been induced to produce protein. To extract this protein, the bacteria cells themselves must be separated out of their liquid media. This is done using large centrifuges, which spin the cultures in buckets and separate solids into a pellet and liquids into a supernatant. The supernatant can be poured off and the bacteria pellet collected, to be purified later to extract the protein from the cells.
- Lysis and resuspension: Once the bacteria cells have been separated from their liquid environment, they must be broken open to allow access to the proteins inside. This is done in lysis buffer, and the cells themselves are exposed to physical disruption such as sonication or other such high pressure situations to break them open. Then, the protein is dissolved into the surrounding buffer that maintains a proper pH and salt environment to keep it folded so that it can be further purified and studied.
One advantage to this method of protein expression is that the plasmid can be manipulated to contain whatever you want. Scientists have developed affinity tags to make it easier for a protein to find and attach to a specific molecule. This means that only that protein will bind to the molecule, and if the molecule is affixed to a solid surface like, say, a column, then the protein sticks while the rest of the cellular debris falls off. The protein can also be coded to have a fluorescent tag on one end to make it easier to see inside of the cell and track its progress. This not only enables purification while checking for the presence of a particular color, but also allows the study of the protein within the cell conducting its natural function.
Technique: Affinity Chromatography Purification
To adequately study a protein, scientists must separate it from all other materials and proteins within a cell. How can this happen with something so small? As mentioned above, the protein’s gene can be encoded with an affinity tag that allows it to recognize and bind to a number of small molecules. One of the most commonly used affinity tags is multiple histidine amino acids in a chain. These histidines recognize and bind to nickel, which can be added to a column to attract and bind to proteins. Then, everything is washed through with lots of buffer to keep the protein stable but attached to the column. Once the protein is washed, it is removed from the column using imidazole, which resembles a histidine and binds much more tightly to the nickel resin than histidines do. This effectively pushes the protein-histidine combination off the column in what is known as an elution. Once the protein is harvested, the following is an example procedure for running column chromatography:
- Bind protein in solution to nickel (either by stirring it with free resin or flowing it very slowly over a column on a fast protein liquid chromatography machine (FPLC))
- Wash column with lots of buffer to remove other materials and contaminants
- Elute protein off of column using imidazole in buffer solution
- Run a gel to confirm that the protein is there without any other contaminants
Technique: Size Exclusion Chromatography Purification
Once a protein is purified by column chromatography, usually based on its affinity tags and/or pI interacting with a positively or negatively charged column, it is necessary to confirm the identity of the protein. This is often accomplished using a knowledge of the proteins size in comparison to other common contaminants. A size exclusion chromatography column (aka a gel chromatography column) can be used to evaluate the molecular weight of a protein (often measured in Daltons, can be calculated from the protein’s sequence or in some cases is known in the literature of common proteins). The size exclusion column contains tiny inert beads with ridges and grooves. These crevices act as a sieve, partitioning smaller proteins away from larger ones because the smaller proteins can enter the grooves while larger proteins cannot. Therefore, larger proteins, oligomers (combinations of multiple proteins), or aggregated protein comes off the column first, while smaller sized proteins take longer to come off.
- A small volume of protein is injected into the top or valve of a size exclusion column (SEC); this may involve concentrating a protein using a membrane concentrator
- Run buffer through the column slowly
- Collect small fractions equivalent to the initial small volume
- Run a gel to confirm the identity of the protein and lack of impurities
Itís nearly impossible to find experienced people on this subject, but you sound like you know what youíre talking about! Thanks